Equation OCR Tutorial Part 3: Making an OCR for Equations using OpenCV and Tesseract
Categories Computer Vision, Uncategorized
I’ll be doing a series on using OpenCV and Tesseract to take a scanned image of an equation and be able to read it in and graph it and give related data. I was surprised at how well the results turned out =)
I will be using versions OpenCV 2.4.2 and Tesseract OCR 3.02.02.
I have also made two tutorials on installing Teseract and OpenCV for Vista x86 on Microsoft Visual Studio 2008 Express. However, you can go on the official sites for official documentation on installing the libraries on your system.

Parts
Equation OCR Part 1: Using contours to extract characters in OpenCV
Equation OCR Part 2: Training characters with Tesseract OCR
Equation OCR Part 3: Equation OCR
Tutorials
Installing OpenCV: http://blog.ayoungprogrammer.com/2012/10/tutorial-install-opencv-242-for-windows.html/
Installing Tesseract: http://blog.ayoungprogrammer.com/2012/11/tutorial-installing-tesseract-ocr-30202.html/
Official Links:
OpenCV : http://opencv.org/
Tesseract OCR: http://code.google.com/p/tesseract-ocr/
Overview:
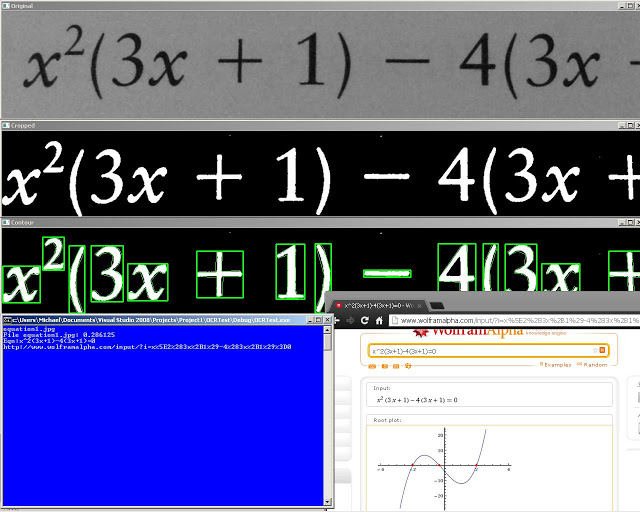
The overall goal of the final program is to be able to convert the image of an equation into a text equation that we will be able to graph. We can break down this project into three parts, extracting characters from text, training for the OCR and recognition for converting images of equations into text.
Recognition
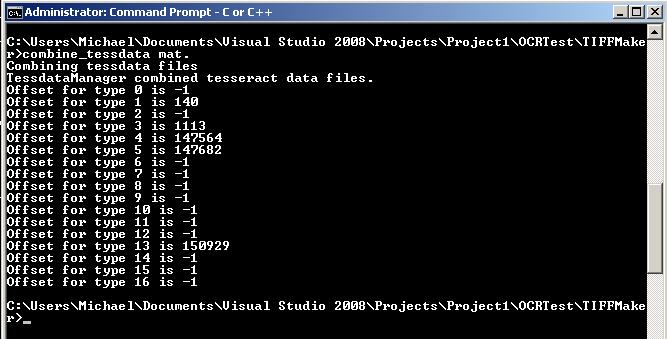
Recognition is easy once we have the training files we need for Tesseract. To initialize for our language and set recognition mode for characters:
tess_api.Init(“”, “mat”, tesseract::OEM_DEFAULT);
tess_api.SetPageSegMode(static_cast<tesseract::PageSegMode>(10));
After extracting all the characters we can use Tesseract on those single characters to get the recognized character.
OpenCV uses a different data storage type from Tesseract but we can easily extract the raw data from a Mat to Tesseract.
tess_api.TesseractRect( resizedPic .data, 1, resizedPic .step1(), 0, 0, resizedPic .cols, resizedPic .rows);
tess_api.SetImage(resizedPic .data,resizedPic.size().width,resizedPic .size().height,resizedPic .channels(),resizedPic .step1());
tess_api.Recognize(0);
const char* out=tess_api.GetUTF8Text();
In the output we should find a character for the recognized character. Since the characters have been sorted from left to right we can just append all these recognized characters into a string stream and output the final results.
Exponents
In a polynomial there are variables (x) , numbers brackets and exponents. The exponents can easily be found by checking if the bottom of a character reaches 2/3 of the way down to the bottom. If it doesn’t than it is probably superscript and we can put a ^ in front of the number to signify an exponent.The green line shows the 2/3 line to check. As you can see all the standard characters that are not exponents will go past the 2/3 line.

Wolfram
To send the equation to Wolfram Alpha I had to reverse the URL format they use which was quite simple. All URL’s begin with : “http://www.wolframalpha.com/input/?i=”. Numbers and letters map to themselves but other characters map to hexcodes:
if(eqn[i]==’+’)url<<“%2B”;
if(eqn[i]==’^’)url<<“%5E”;
if(eqn[i]==’=’)url<<“%3D”;
if(eqn[i]=='(‘)url<<“%28”;
if(eqn[i]==’)’)url<<“%29”;
Extensions
The program can be extended to work for other functions such as log, sin, cos, etc by doing some additional training for letters. It can also be extended to work for fraction bars although it takes some more work. You first look for any “bars” which are any shapes with width 3 times greater than length and you also check if there are shapes above and below the bar. When you do this, you want to take the longest bar first because you want to find the largest fraction first. Then you can recursively find fractions in the numerator and denominator of the fraction going from largest fraction to smallest fraction. Then you can just append to the string (numerator) / (denominator). However, there may be other terms that are not fractions to the left and right of the fraction and you will need to resort by x-coordinates.
Conclusion
In finishing this tutorial I hope you have learned how to use OCR and contours extraction as I certainly have. If you release any extensions of programs through my tutorials I hope you will credit me and also give me message. Thanks for reading!