Tutorial: Creating a Multiple Choice Scanner with OpenCV

Categories Computer Vision, Uncategorized
EDIT (July 14, 2016): A better way to extract would be to use page markers.
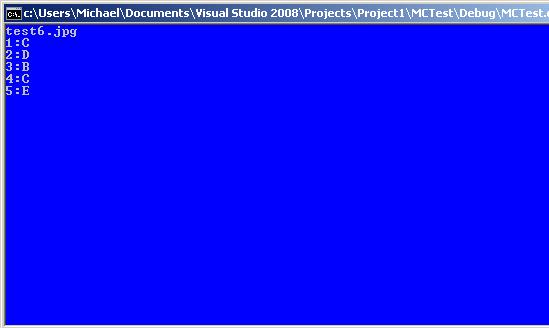
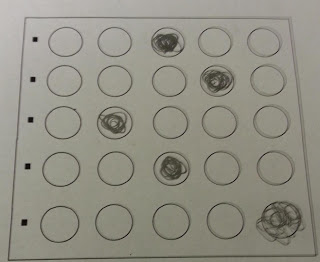
This is a tutorial on creating a multiple choice scanner similar to the Scantron system. We will take a photo of a multiple choice answer sheet and we will find the corresponding letter of the bubbles. I will be using OpenCV 2.4.3 for this project.

Source code : https://github.com/ayoungprogrammer/MultipleChoiceScanner
Algorithm

We can split the algorithm into 9 parts:
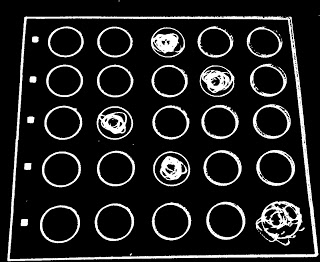
1. Perform image preprocessing to make the image black & white (binarization)
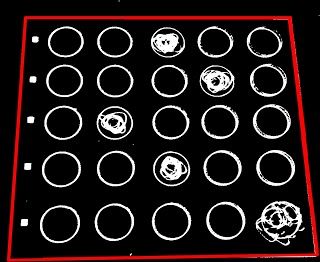
2. Use hough transform to find the lines in the image
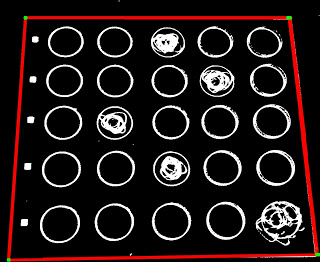
3. Find point of intersection of lines to form the quadrilateral
4. Apply a perspective transform to the quadrilateral
5. Use hough transform to find the circles in the image
6. Sort circles into rows and columns
7. Find circles with area 30% or denser and designate these as “filled in”
Thanks to this tutorial for helping me find POI and using perspective transformation

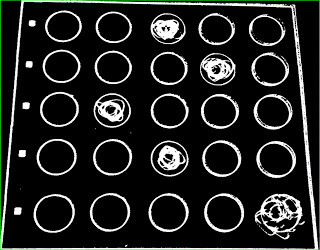
1. Image Preprocesssing

I like to use my favourite binarization method for cleaning up the image:
 – First apply a gaussian blur to blur the image a bit to get rid of random dots
 – Use adaptive thresholding to set each pixel to black or white
 cv::Size size(3,3);  
 cv::GaussianBlur(img,img,size,0);  
 adaptiveThreshold(img, img,255,CV_ADAPTIVE_THRESH_MEAN_C, CV_THRESH_BINARY,75,10);  
  cv::bitwise_not(img, img);


We get a nice clean image with distinct shapes marked in white. However, we do get a few dots of white but they shouldn’t affect anything.

2. Hough transfrom to get lines

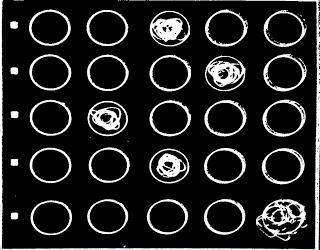
Use a probabilistic Hough line detection to find the sides of the rectangle. It works by going to every point in the image and checking if a line exists for all the angles. This is the most expensive operation in the whole process because it has to check every point and angle.
 cv::Mat img2;  
  cvtColor(img,img2, CV_GRAY2RGB);  
  vector<Vec4i> lines;  
  HoughLinesP(img, lines, 1, CV_PI/180, 80, 400, 10);  
  for( size_t i = 0; i < lines.size(); i++ )  
  {  
   Vec4i l = lines[i];  
   line( img2, Point(l[0], l[1]), Point(l[2], l[3]), Scalar(0,0,255), 3, CV_AA);   
  }

3. Find POI of lines

From: http://opencv-code.com/tutorials/automatic-perspective-correction-for-quadrilateral-objects/

However, we need to sort the points from top left to bottom right:

 bool comparator(Point2f a,Point2f b){  
  return a.x<b.x;  
  }  
 void sortCorners(std::vector<cv::Point2f>& corners, cv::Point2f center)  
 {  
   std::vector<cv::Point2f> top, bot;  
   for (int i = 0; i < corners.size(); i++)  
   {  
     if (corners[i].y < center.y)  
       top.push_back(corners[i]);  
     else  
       bot.push_back(corners[i]);  
   }  
  sort(top.begin(),top.end(),comparator);  
  sort(bot.begin(),bot.end(),comparator);  
   cv::Point2f tl = top[0].x;  
   cv::Point2f tr = top[top.size()-1];  
   cv::Point2f bl = bot[0];  
   cv::Point2f br = bot[bot.size()-1];  
   corners.clear();  
   corners.push_back(tl);  
   corners.push_back(tr);  
   corners.push_back(br);  
   corners.push_back(bl);  
 }  
 // Get mass center  
  cv::Point2f center(0,0);  
  for (int i = 0; i < corners.size(); i++)  
  center += corners[i];  
  center *= (1. / corners.size());  
  sortCorners(corners, center);

4. Apply a perspective transform

At first I used a minimum area rectangle for extracting the region and cropping it but i got a slanted image. Because the picture was taken at an angle, the rectangle we took a picture of, has become a trapezoid. However, if you’re using a scanner, than this shouldn’t be too much an issue.
However, we can fix this with a perspective transform and OpenCV supplies a function for doing so.
 // Get transformation matrix  
  cv::Mat transmtx = cv::getPerspectiveTransform(corners, quad_pts);  
  // Apply perspective transformation  
  cv::warpPerspective(img3, quad, transmtx, quad.size());

5. Find circles

We use Hough transform to find all the circles using a provided function for detecting them.
 
cvtColor(img,cimg, CV_BGR2GRAY);
 vector<Vec3f> circles;  
   HoughCircles(cimg, circles, CV_HOUGH_GRADIENT, 1, img.rows/16, 100, 75, 0, 0 );  
     for( size_t i = 0; i < circles.size(); i++ )  
   {  
   Point center(cvRound(circles[i][0]), cvRound(circles[i][1]));  
   int radius = cvRound(circles[i][2]);  
   // circle center  
   circle( testImg, center, 3, Scalar(0,255,0), -1, 8, 0 );  
   // circle outline


6. Sort circles into rows and columns

Now that we have the valid circles we should sort them into rows and columns. We can check if two circles are in a row with a simple test:
y1 = y coordinate of centre of circle 1
y2 = y coordinate of centre of circle 2
r = radius
y2-r > y1 and y2+r<y1
If two circles pass this test, then we can say that they are in the same row. We do this to all the circle until we have figure out which circles are in which rows.Row is an array of data about each row and index. The double part of the pair is the y coord of the row and the int is the index of arrays in bubble (used for sorting).

 vector<vector<Vec3f> > bubble;  
 vector<pair<double,int> > row;  
 for(int i=0;i<circles.size();i++){  
  bool found = false;  
  int r = cvRound(circles[i][2]);   
   int x = cvRound(circles[i][0]);  
   int y= cvRound(circles[i][1]);  
  for(int j=0;j<row.size();j++){  
 int y2 = row[j].first;  
   if(y-r<y2&&y+r>y2){  
   bubble[j].push_back(circles[i]);  
   found = true;  
   break;  
   }  
  }  
  if(!found){  
   int l = row.size();  
   row.push_back(make_pair(y,l));  
   vector<Vec3f> v;  
   v.push_back(circles[i]);  
   bubble.push_back(v);  
  }  
  found = false;  
  }

Then sort the rows by y coord and inside each row sort by x coord so you will have a order from top to bottom and left to right.

bool comparator2(pair<double,int> a,pair<double,int> b){  
  return a.first<b.first;  
 }  
 bool comparator3(Vec3f a,Vec3f b){  
  return a[0]<b[0];  
 }  
 ....  
 sort(row.begin(),row.end(),comparator2);  
 for(int i=0;i<bubble.size();i++){  
  sort(bubble[i].begin(),bubble[i].end(),comparator3);  
 }

7. Check bubble

Now that we have each circle sorted, in each row we can check if the density of pixels is 30% or higher which will indicate that it is filled in.
We can use countNonZero to count the filled in pixels over the area of the region.
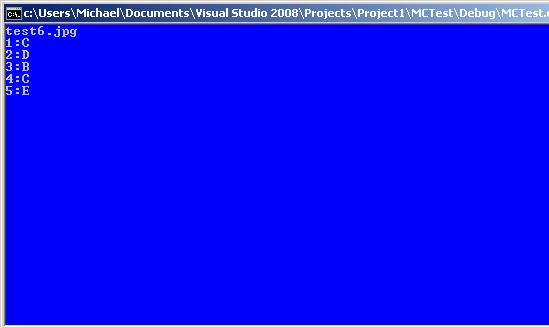
In each row, we look for the highest filled density over 30% and it will most likely be the answer that is highlighted. However, if none are found then it is blank.
for(int i=0;i<row.size();i++){  
   double max = 0;  
   int ind = -1;  
   for(int j=0;j<bubble[row[i].second].size();j++){  
    Vec3f cir = bubble[row[i].second][j];  
    int r = cvRound(cir[2]);  
    int x = cvRound(cir[0]);  
    int y= cvRound(cir[1]);  
   Point c(x,y);  
    // circle outline  
   circle( img, c, r, Scalar(0,0,255), 3, 8, 0 );  
   Rect rect(x-r,y-r,2*r,2*r);  
   Mat submat = cimg(rect);  
   double p =(double)countNonZero(submat)/(submat.size().width*submat.size().height);  
   if(p>=0.3 && p>max){  
    max = p;  
    ind = j;  
   }  
   }  
       if(ind==-1)printf("%d:-",i+1);  
   else printf("%d:%c",i+1,'A'+ind);  
   cout<<endl;  
     }  
 }

70 Comments

  • Richiely Batista
    August 30, 2013

    Hi!
    Nice post.
    Could you send me the code, please!?

    my e-mail is: [email protected]

  • Gabriel Rosini
    November 11, 2013

    Hello!
    Could you send me the code?

    my e-mail is: [email protected]

  • Didid Ikhsan
    November 12, 2013

    hello
    a very interesting post.
    Could you send me the code?

    my e-mail is: [email protected]

  • Thana seelan
    January 15, 2014

    i want this code plzzz
    Could you send me the code?
    my email ID: [email protected]

  • Sanya
    January 26, 2014

    Hi Michael.. Very nice post.. Is the code available too?
    Please mail me at [email protected]

  • Yuri Alberto
    February 25, 2014

    Que mas hermano, puedo publicar una version en españor en mi blog y con todo el codigo. Hello, I can show your post in my Blog. It's work and code complete.

  • Xuân Nguyễn
    March 18, 2014

    Hi Michael.. Very nice post!
    Please mail me at [email protected]

  • Nurzhan Mussabekov
    May 11, 2014

    Hi Michael…Could you send me the code, plzz?
    my email ID: [email protected]

  • GUNDA PRAVEEN KUMAR
    May 19, 2014

    Hi Micheal
    could you send me the code please
    my email id: [email protected]

  • bac nguyen
    June 9, 2014

    Hi Michael…Could you send me the code?
    my email ID: [email protected]

  • Ümit Çelik
    June 10, 2014

    Hi Michael, Could you send me the code and image? I am struggling the all day to get the same result but somethings go wrong always,
    I am working on Mac and opencv version 2.4.9

    • ayoungprogrammer
      June 11, 2014

      Sorry I only have code in Windows

    • bac nguyen
      June 11, 2014

      Could you send me the code in Windows? please!!

  • fdiedler
    June 19, 2014

    Hi Michael,
    Can you send me your code please ?
    email : [email protected]

    Thanks 🙂

  • Carlos Henrique Lemos
    June 24, 2014

    Hi Michael,
    Can you send me your code please ?
    email : [email protected]

    Thanks 🙂

  • Germanno Teles
    July 2, 2014

    Hi Michael,
    Can have the code too?
    [email protected]

  • Mark
    July 25, 2014

    Hi!
    Could you send me the code?
    Email: [email protected]

  • ilyas
    August 7, 2014

    Hi!
    Could you send me the code?
    Email: [email protected]

  • Dofs Almario
    September 1, 2014

    Hi,
    Great code. Could you send mo the code.
    Email: [email protected]

    Thanks

  • Issam Farran
    September 14, 2014

    Hi Michael,
    This is simply great, and has already saved me a LOT of effort & time.
    Can you please send me the code to [email protected] ? I"ll appreciate it a lot.

  • Abed Khaled
    September 14, 2014

    can you send me the code please
    it would be appreciated

    [email protected]

  • teacherfelix
    October 15, 2014

    hello Michael… thanks a lot for sharing your knowledge… it will give us teachers savings in our TIME in checking.. i am hoping that you will also share the code to me… here is my email address: [email protected]

  • mustafa göl
    June 8, 2015

    Hi Michael, your tutorial is very helpful. There is one problem. I found more than one line for my edges, totaly 11. I changed the parameters of functions but i could not overcome. I think that merging or averaging lines is reasonable but I couldn't find the way. Do you have any suggestion? Thanks.

  • Elsy Noh
    December 6, 2015

    Hi Michael, thanks for sharing your knowledge.
    could you send me the code?
    email: [email protected]

  • Jake Bardinas
    March 11, 2016

    can u send me the code ??? please thank u 🙂

    [email protected]

  • aleksandar micic
    March 29, 2016

    Can you send me a code..and is there some tutorial how to run this?
    [email protected]
    And thank you.

  • Mickey Friedman
    April 26, 2016

    H! Can you send me the code/give me instructions on how to run it? Thank you!

    [email protected]

  • Madu Acalud
    May 25, 2016

    Tnx a lot Michael. It was very helpful

    I was checking you post on markers to find ROI but the link (
    http://blog.ayoungprogrammer.com/2014/03/tutorial-omr-scanning-form-recognition.html) was not available.

  • Khagesh Desai
    July 12, 2016

    Hi Michael,
    This is superb.
    Can you please send me the code to [email protected] ? I”ll appreciate it a lot.

  • Madhup
    September 15, 2016

    Hi Michael,
    Great tutorial. I am beginner to Python and am trying to create an OMR sheet reading set-up for my company. It would be great if you could please share the code you have used. It would be great help

  • Paulo
    October 2, 2016

    Great help for everyone. Can you share your code? Thanks in advance. Please send to [email protected]

  • brutalremus
    October 30, 2016

    Hi, ı want to desing this Project with java(android). Can you help me? Please dear outhor

  • Dave
    November 5, 2016

    Please can you send me the source code to [email protected]

    Thanks

  • kérisson
    November 17, 2016

    the http://opencv-code.com/tutorials/automatic-perspective-correction-for-quadrilateral-objects/ is inaccessible. How to resolve?

  • Airah
    February 9, 2017

    Hi do u have codes for android base multiple choice exam scanner?

    • Airah
      February 9, 2017

      Pls reply thanks

      • ayoungprogrammer
        February 23, 2017

        Sorry, I don’t have any code for that

  • vishal
    February 23, 2017

    Hi Michael…Could you send me the code?
    my email ID [email protected]

  • amir
    March 17, 2017

    hi , I tried your code …. but the the result of the exam doesnot appear , whats the problem you think ?

  • Muhammad Usman Ghani
    May 17, 2017

    can you send the [email protected]

  • Tarun Bhagat
    May 23, 2017

    Nice..
    but can you help me for android..

  • Vamsi Vudatala
    May 25, 2017

    nice post.. Could you send me the code plzz..my e-mail is [email protected]

  • sid
    June 14, 2017

    please can u send me the code [email protected]

  • Abhishek Kateliya
    June 29, 2017

    Hi Michael, this is indeed very helpful post, but can you suggest me java code for the same,
    Ive been trying this since a month.
    Please help

    • ayoungprogrammer
      July 7, 2017

      Sorry, I don’t have Java code available for this.

  • martin
    July 12, 2017

    hi can you send this project?
    thank [email protected]

  • camila
    July 21, 2017

    Hola! el tutorial muy claro, pero tengo un problema, me levanta las imágenes pero no me da el resultado final…

  • Adam
    November 1, 2017

    fatal error: opencv2/highgui/highgui.hpp: No such file and directory

  • Veda
    January 7, 2018

    Hi! Can you send me the code please?

    [email protected]. Thank you!

  • Python OpenCV, Houghline detection around paper – program faq
    March 15, 2018

    […] I need to form a bounding rectangle around it to carry on the further process from the tutorials here and […]

  • ben
    April 5, 2018

    Couldn’t you have used findContours() to find the bondary of the answer sheet? Is using HoughLinesP better? I’m new to image processing.

  • Minh
    April 8, 2018

    I got the error at line cv::Point2f tl = top[0];
    cv::Point2f tr = top[top.size() – 1];
    cv::Point2f bl = bot[0];
    cv::Point2f br = bot[bot.size() – 1];
    when I tried with the other image.

  • vc
    April 27, 2018

    if i change the image and instead use OMR of more than 5 questions, will it still work? if not what all do i have to change??

  • janith
    May 3, 2018

    Reply
    Hello There!
    Could you send me the code

  • jv
    May 23, 2018

    I wonder if you have a tutorial on how to create a customize answer sheet. It’s a big help for me.

  • Malik
    June 2, 2018

    Hi, it’s very helpful please send me code [email protected]
    Thanks

  • TVD
    June 25, 2018

    Hello, i using java but error load text

  • omkar kachare
    October 8, 2018

    Hi! i got error ..printf was not declared in this scope
    please help me.

  • Dr. Ashfak
    December 14, 2018

    Hi,

    Please send code of this to me on email id: [email protected]

  • Abdul Latif
    January 9, 2019

    Great !
    I realy need this code

  • malik
    March 26, 2019

    it is possible we can read if multi marks?
    what needs to be changed in the code to get multi marks,

  • Thomas
    January 8, 2020

    Hi can i have the code to my email for Study purposes? Thanks in advance!
    Email: [email protected]

  • OpenCV | Andreas' Blog
    April 8, 2020

    […] Tutorial: Creating a Multiple Choice Scanner with OpenCV github.com/ayoungprogrammer/MultipleChoiceScanner, A multiple choice scanner […]

Leave a Reply

Your email address will not be published. Required fields are marked *