Tutorial: Creating a Multiple Choice Scanner with OpenCV
Categories Computer Vision, Uncategorized
EDIT (July 14, 2016): A better way to extract would be to use page markers.
This is a tutorial on creating a multiple choice scanner similar to the Scantron system. We will take a photo of a multiple choice answer sheet and we will find the corresponding letter of the bubbles. I will be using OpenCV 2.4.3 for this project.
Source code : https://github.com/ayoungprogrammer/MultipleChoiceScanner


Algorithm
We can split the algorithm into 9 parts:
1. Perform image preprocessing to make the image black & white (binarization)
2. Use hough transform to find the lines in the image
3. Find point of intersection of lines to form the quadrilateral
4. Apply a perspective transform to the quadrilateral
5. Use hough transform to find the circles in the image
6. Sort circles into rows and columns
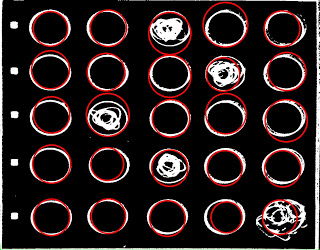
7. Find circles with area 30% or denser and designate these as “filled in”
Thanks to this tutorial for helping me find POI and using perspective transformation
1. Image Preprocesssing
I like to use my favourite binarization method for cleaning up the image:
– First apply a gaussian blur to blur the image a bit to get rid of random dots
– Use adaptive thresholding to set each pixel to black or white
 cv::Size size(3,3);
 cv::GaussianBlur(img,img,size,0);
 adaptiveThreshold(img, img,255,CV_ADAPTIVE_THRESH_MEAN_C, CV_THRESH_BINARY,75,10);
  cv::bitwise_not(img, img);
We get a nice clean image with distinct shapes marked in white. However, we do get a few dots of white but they shouldn’t affect anything.

2. Hough transfrom to get lines
Use a probabilistic Hough line detection to find the sides of the rectangle. It works by going to every point in the image and checking if a line exists for all the angles. This is the most expensive operation in the whole process because it has to check every point and angle.
 cv::Mat img2;
  cvtColor(img,img2, CV_GRAY2RGB);
  vector<Vec4i> lines;
  HoughLinesP(img, lines, 1, CV_PI/180, 80, 400, 10);
  for( size_t i = 0; i < lines.size(); i++ )
  {
   Vec4i l = lines[i];
   line( img2, Point(l[0], l[1]), Point(l[2], l[3]), Scalar(0,0,255), 3, CV_AA);
  }

3. Find POI of lines
From: http://opencv-code.com/tutorials/automatic-perspective-correction-for-quadrilateral-objects/

However, we need to sort the points from top left to bottom right:
 bool comparator(Point2f a,Point2f b){
  return a.x<b.x;
  }
 void sortCorners(std::vector<cv::Point2f>& corners, cv::Point2f center)
 {
   std::vector<cv::Point2f> top, bot;
   for (int i = 0; i < corners.size(); i++)
   {
     if (corners[i].y < center.y)
       top.push_back(corners[i]);
     else
       bot.push_back(corners[i]);
   }
  sort(top.begin(),top.end(),comparator);
  sort(bot.begin(),bot.end(),comparator);
   cv::Point2f tl = top[0].x;
   cv::Point2f tr = top[top.size()-1];
   cv::Point2f bl = bot[0];
   cv::Point2f br = bot[bot.size()-1];
   corners.clear();
   corners.push_back(tl);
   corners.push_back(tr);
   corners.push_back(br);
   corners.push_back(bl);
 }
 // Get mass center
  cv::Point2f center(0,0);
  for (int i = 0; i < corners.size(); i++)
  center += corners[i];
  center *= (1. / corners.size());
  sortCorners(corners, center);
4. Apply a perspective transform
At first I used a minimum area rectangle for extracting the region and cropping it but i got a slanted image. Because the picture was taken at an angle, the rectangle we took a picture of, has become a trapezoid. However, if you’re using a scanner, than this shouldn’t be too much an issue.
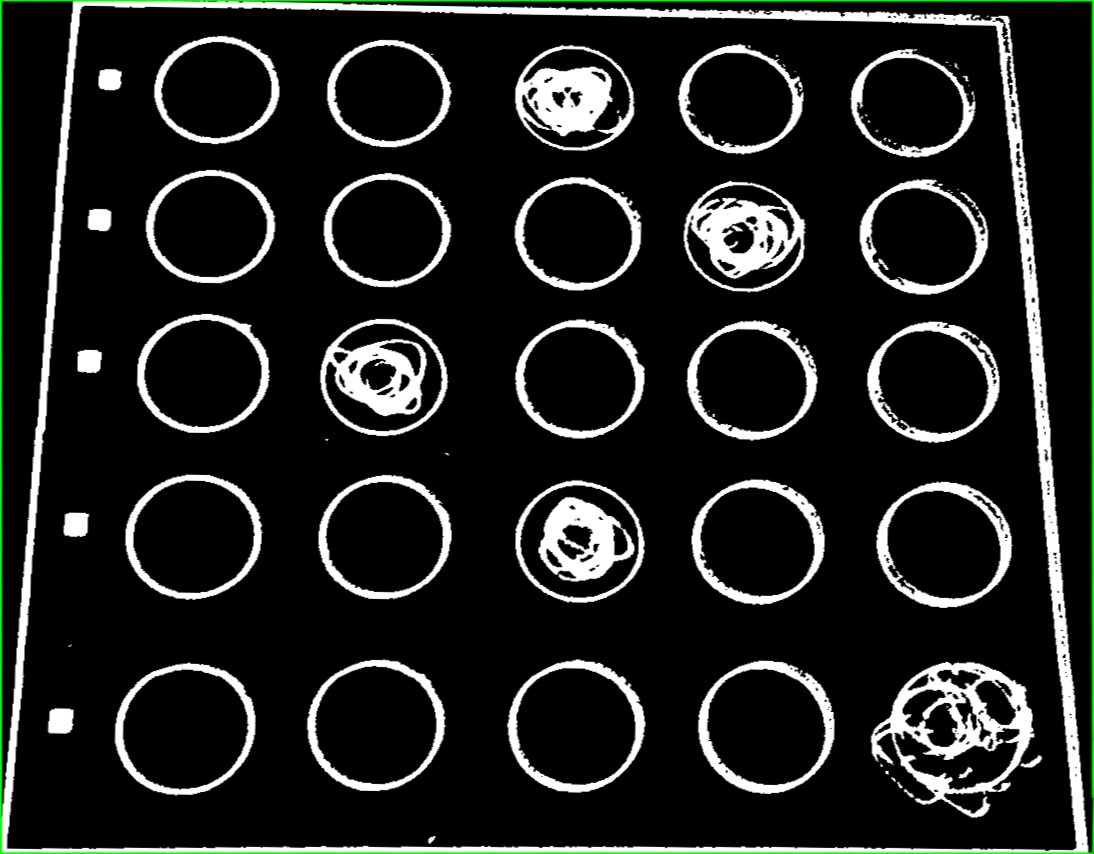
However, we can fix this with a perspective transform and OpenCV supplies a function for doing so.
 // Get transformation matrix
  cv::Mat transmtx = cv::getPerspectiveTransform(corners, quad_pts);
  // Apply perspective transformation
  cv::warpPerspective(img3, quad, transmtx, quad.size());

5. Find circles
We use Hough transform to find all the circles using a provided function for detecting them.
cvtColor(img,cimg, CV_BGR2GRAY);
 vector<Vec3f> circles;
   HoughCircles(cimg, circles, CV_HOUGH_GRADIENT, 1, img.rows/16, 100, 75, 0, 0 );
     for( size_t i = 0; i < circles.size(); i++ )
   {
   Point center(cvRound(circles[i][0]), cvRound(circles[i][1]));
   int radius = cvRound(circles[i][2]);
   // circle center
   circle( testImg, center, 3, Scalar(0,255,0), -1, 8, 0 );
   // circle outline

6. Sort circles into rows and columns
Now that we have the valid circles we should sort them into rows and columns. We can check if two circles are in a row with a simple test:
y1 = y coordinate of centre of circle 1
y2 = y coordinate of centre of circle 2
r = radius
y2-r > y1 and y2+r<y1
If two circles pass this test, then we can say that they are in the same row. We do this to all the circle until we have figure out which circles are in which rows.Row is an array of data about each row and index. The double part of the pair is the y coord of the row and the int is the index of arrays in bubble (used for sorting).
 vector<vector<Vec3f> > bubble;
 vector<pair<double,int> > row;
 for(int i=0;i<circles.size();i++){
  bool found = false;
  int r = cvRound(circles[i][2]);
   int x = cvRound(circles[i][0]);
   int y= cvRound(circles[i][1]);
  for(int j=0;j<row.size();j++){
 int y2 = row[j].first;
   if(y-r<y2&&y+r>y2){
   bubble[j].push_back(circles[i]);
   found = true;
   break;
   }
  }
  if(!found){
   int l = row.size();
   row.push_back(make_pair(y,l));
   vector<Vec3f> v;
   v.push_back(circles[i]);
   bubble.push_back(v);
  }
  found = false;
  }
Then sort the rows by y coord and inside each row sort by x coord so you will have a order from top to bottom and left to right.
bool comparator2(pair<double,int> a,pair<double,int> b){
  return a.first<b.first;
 }
 bool comparator3(Vec3f a,Vec3f b){
  return a[0]<b[0];
 }
 ....
 sort(row.begin(),row.end(),comparator2);
 for(int i=0;i<bubble.size();i++){
  sort(bubble[i].begin(),bubble[i].end(),comparator3);
 }
7. Check bubble
Now that we have each circle sorted, in each row we can check if the density of pixels is 30% or higher which will indicate that it is filled in.
We can use countNonZero to count the filled in pixels over the area of the region.
In each row, we look for the highest filled density over 30% and it will most likely be the answer that is highlighted. However, if none are found then it is blank.
for(int i=0;i<row.size();i++){
double max = 0;
int ind = -1;
for(int j=0;j<bubble[row[i].second].size();j++){
Vec3f cir = bubble[row[i].second][j];
int r = cvRound(cir[2]);
int x = cvRound(cir[0]);
int y= cvRound(cir[1]);
Point c(x,y);
// circle outline
circle( img, c, r, Scalar(0,0,255), 3, 8, 0 );
Rect rect(x-r,y-r,2*r,2*r);
Mat submat = cimg(rect);
double p =(double)countNonZero(submat)/(submat.size().width*submat.size().height);
if(p>=0.3 && p>max){
max = p;
ind = j;
}
}
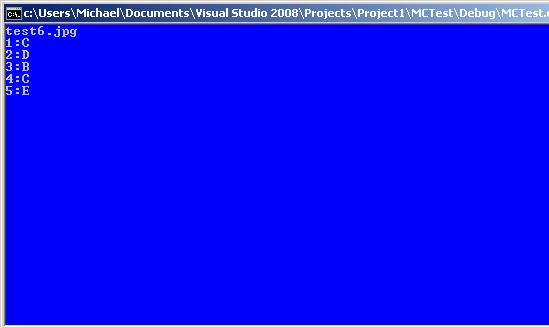
if(ind==-1)printf("%d:-",i+1);
else printf("%d:%c",i+1,'A'+ind);
cout<<endl;
}
}
Source code here: https://github.com/ayoungprogrammer/MultipleChoiceScanner