Equation OCR Tutorial Part 1: Using contours to extract characters in OpenCV

Categories Computer Vision, Uncategorized
I’ll be doing a series on using OpenCV and Tesseract to take a scanned image of an equation and be able to read it in and graph it and give related data. I was surprised at how well the results turned out =)

I will be using versions OpenCV 2.4.2 and Tesseract OCR 3.02.02.

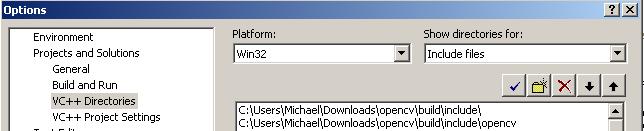
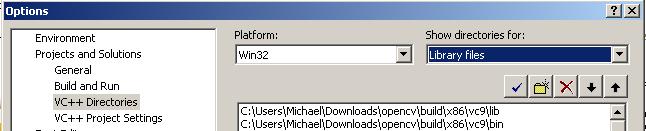
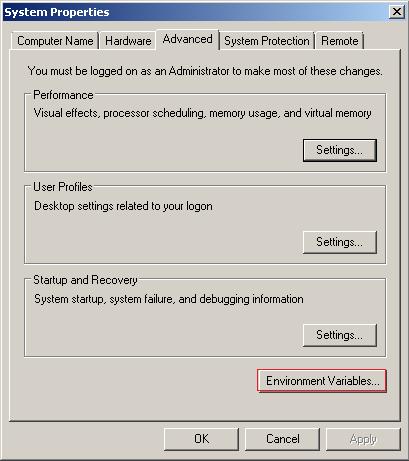
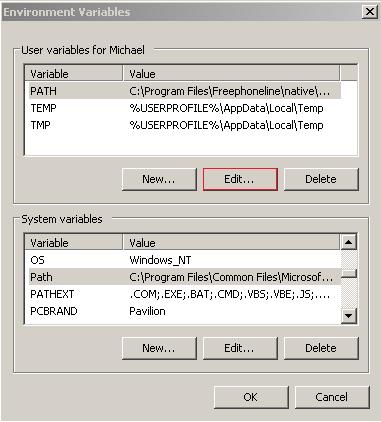
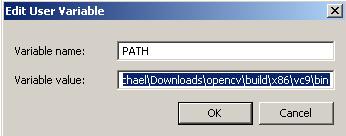
 I have also made two tutorials on installing Teseract and OpenCV for Vista x86 on Microsoft Visual Studio 2008 Express. However, you can go on the official sites for official documentation on installing the libraries on your system.

Parts

Equation OCR Part 1: Using contours to extract characters in OpenCV
Equation OCR Part 2: Training characters with Tesseract OCR
Equation OCR Part 3: Equation OCR

Tutorials

Installing OpenCV: http://blog.ayoungprogrammer.com/2012/10/tutorial-install-opencv-242-for-windows.html/

Installing Tesseract: http://blog.ayoungprogrammer.com/2012/11/tutorial-installing-tesseract-ocr-30202.html/

Official Links:

OpenCV : http://opencv.org/
Tesseract OCR: http://code.google.com/p/tesseract-ocr/

Overview:

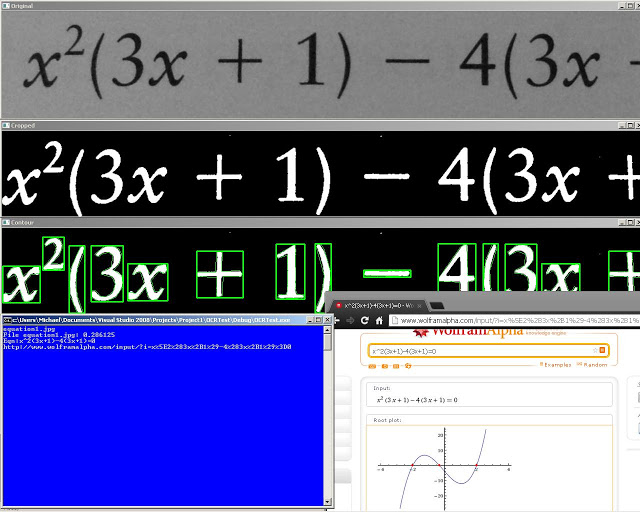
The overall goal of the final program is to be able to convert the scanned text into a recognizable format that will be able to be processed later. We can break down this project into three parts, extracting characters from text, training for the OCR and recognition that will be able to convert images of equations into graphs of the equations. 

Extraction:

Now we can break down extraction to even more steps: preprocessing and contour analysis.

Preprocessing

The first step of preprocessing is to smooth out the image and make it a binary image (black or white) for contour analysis. This is our original image:
 cv::Mat img = cv::imread(“equation1.jpg”, 0);
We first apply a Gaussian blur to smooth out the image. We then use adaptive thresholding to binarize the image (make it black or white) and we then invert the colours since OpenCV uses black as the background and white as the objects.
  cv::Size size(3,3);
  cv::GaussianBlur(img,img,size,0);
   adaptiveThreshold(img, img,255,CV_ADAPTIVE_THRESH_MEAN_C, CV_THRESH_BINARY,75,10);
  cv::bitwise_not(img, img);

Next we have the fix the angle of the text. In this case the offset angle isn’t bad maybe plusminus 1 or 2 degrees, but in other cases where the angle is greater we will need to fix the angle. We can do this by finding the minimum bounding box around the line of text. This method is better for straight linear text, however I later discovered that when you have the variable y or have large brackets or when the expression is very short this method fails and the smallest area rectangle will have a large rotation. It suits our purpose thought for long equations. There is probably a better way to do this with Hu moments but this will suffice. I took this method from another blog:
http://felix.abecassis.me/2011/10/opencv-rotation-deskewing/
Now we have this rotated box around our aligned text we can just make that box our new bounding box.

Contour Extraction

Next we can use OpenCV’s contour function to detect and find all the “blobs” or shapes. I also check if any of the shapes are greater than a certain area because if the shape is very small then it is probably junk. Another issue is that some characters like the equal sign “=” contain two shapes but this can easily be fixed. We can check if two shapes are on top of another if the x coordinates of their centres are within a certain threshold. Then, we can combine the shapes and make a new contour out of it.
cv:: findContours( cropped, contours, hierarchy, CV_RETR_EXTERNAL, CV_CHAIN_APPROX_TC89_KCOS, Point(0, 0) );

Now that we have found all our contours all we need to do is extract each contour and save them. We can take the bounding rectangle of each contour and cut that part out of the original image. However, there are some cases where the bounding rectangle will take part of another shape. To prevent this, we can use a “mask” or basically a filter to copy from the bounding rectangle only pixels within the contour. 

Mat mask = Mat::zeros(image.size(), CV_8UC1);
drawContours(mask, contours_poly, i, Scalar(255), CV_FILLED);


 Mat extractPic;
image.copyTo(extractPic,mask);
Mat resizedPic = extractPic(r);

Here are some sample equations you can use:

Source Code

Source code is available here: http://pastebin.com/Q2x8kHmG

Tutorial: How to Install Tesseract OCR 3.02.02 for Visual Studios 2008 on Windows Vista

Categories Computer Vision, Uncategorized
I could not find a single good tutorial for setting up Tesseract on VS2008 other than the docs that come with Tesseract so I decided to make my own tutorial for those interested.

More updated tutorial: https://github.com/gulakov/tesseract-ocr-sample

1. Download and install the full windows version of Tesseract. This way you won’t have to extract all the different separate files.

http://code.google.com/p/tesseract-ocr/downloads/detail?name=tesseract-ocr-setup-3.02.02.exe
Leave the destination folder as the default (C:Program FilesTesseract-OCR)
Remember to check Tesseract Development files!

2. Open up Microsoft Visual Studio 2008 and go to Tools -> Options
Project solutions -> VC++ Directories -> Show directories for include files

Add:
C:Program FilesTesseract-OCRinclude
C:Program FilesTesseract-OCRincludetesseract
C:Program FilesTesseract-OCRincludeleptonica

3. Next click show directories for -> Library Files


Add:
C:Program FilesTesseract-OCRlib

4. Configure linker options for Tesseract


Right click your project in solution explorer and click properties

Configuration Properties -> Linker->Input ->Additional Dependencies

Add this in there:

libtesseract302.lib
libtesseract302d.lib
liblept168.lib
liblept168d.lib

**You will have to do this for every project
***I think you can do this with the property sheets but I don’t know how to set it up. Message me if you do!

5. Copy  liblept168.dll, liblept168d.dll, libtesseract302.dll and libtesseract302.dll from C:Program FilesTesseract-OCR into your project folder (Optional)


If for some reason when you run your program and you get .dll missing add these files into your project folder.

6. Hello World!


To check if your project works create your main cpp file with this code:


#include <baseapi.h>
#include <allheaders.h>
#include <iostream>

using namespace std;

int main(void){

tesseract::TessBaseAPI api;
api.Init(“”, “eng”, tesseract::OEM_DEFAULT);
api.SetPageSegMode(static_cast<tesseract::PageSegMode>(7));
api.SetOutputName(“out”);

cout<<“File name:”;
char image[256];
cin>>image;
PIX   *pixs = pixRead(image);

STRING text_out;
api.ProcessPages(image, NULL, 0, &text_out);

cout<<text_out.string();

}

Copy this image into your project folder: (Right click save file as)


Copy eng.traineddata from C:Program FilesTesseract-OCRtessdata into your project folder and it should output Hello World! The traineddata file will be used as the data file for reading the text.

More to come! I will be making a tutorial maybe next week on linking OpenCV with Tesseract and maybe also on how to train Tesseract.

Tutorial: Install OpenCV 2.4.2 for Windows Vista on Visual Studios 2008 Express

Categories Computer Vision, Uncategorized
This will be my first tutorial and actual blog post so please bear with me. So for those of you don’t know what OpenCV is: it’s a Open Source library for advanced computer vision algorithms which would otherwise require postgrad work. I think graphical computation is fascinating work because of the various things you can do with it (like make a real time sudoku solver) but I also think it is very difficult to implement. Humans perceive the world through their eyes and we are able to see objects, textures, curved surfaces, and many other things a computer cannot naturally do. Computers on the other hand see things as 1’s and 0’s or as a grid of pixels made of colours. We can easily distinguish objects and words (most of the time, if it’s not my handwriting) and we are also able to fill in things we can’t see with our brain. If something we see is blurry or obscured we are able to use our intuition to fill in what we can’t see. OpenCV allows computers to perceive images in similar ways but yet very differently from humans.

The OpenCV library is an open source library which means it is free to use but it also means that the documentation is not the greatest. Trying to install OpenCV and getting a program to run took me 3 hours going through various tutorials and guides. The legitimate OpenCV guide to installing did not work for me as well as the other guides. I combined a couple of methods together to get it finally working after hours of frustration.

Anyways that was my spiel on computer vision. I have Microsoft Visual Studio 2008 Express installed on my computer on a Windows Vista (x86 machine). These are the steps I used to get OpenCV working on my computer:

1. Download the OpenCV Project

Download the file at: http://sourceforge.net/projects/opencvlibrary/files/opencv-win/2.4.2/OpenCV-2.4.2.exe/download and run the .exe. The application should have extracted a bunch of files into a folder called opencv.

2. Download CMake
 Now download CMake which will be used to “build” the project: http://www.cmake.org/files/v2.8/cmake-2.8.9-win32-x86.exe.

3. Run the CMake GUI program.
Where is the source code: <your  OpenCV folder>
Where to build: <your OpenCV folder/build>

4.  Build the binaries for your OpenCV library
Click configure and select Visual Studio 9 2008.

Click Finish and it will output some information on your compiler.

5. Keep clicking generate until you get no more red text.

6. Configure in Visual Studio 2008 Express
Once you’re done that, open up Visual Studio 2008 Express. Tools -> options

In your “include files” add the following directories:
<your opencv folder>buildinclude
<your opencv folder>buildincludeopencv

In your “library files” add the following directories:
<your opencv folder>buildx86vc9lib

7. Configure .dlls to be used in system

Computer-> right click (properties) -> Advanced system settings

In user variables, go to path and click edit.


Add this line exactly as it is to the variable value. Key word: add. If you delete everything in there, you’re going to have a bad time.
;<your OpenCV folder>buildx86vc9bin>;<your openCV folderbuildcommontbbia32vc9


8. Create Hello World in OpenCV 
Create a new Visual Studio 2008 Express projects. File-> New -> Project.
An empty win32 console project will be fine.

Create a new .cpp file and copy this hello world code into it:

 #include <cv.h>  
 #include <highgui.h>  
 int main ( int argc, char **argv )  
 {  
  cvNamedWindow( "My Window", 1 );  
  IplImage *img = cvCreateImage( cvSize( 640, 480 ), IPL_DEPTH_8U, 1 );  
  CvFont font;  
  double hScale = 1.0;  
  double vScale = 1.0;  
  int lineWidth = 1;  
  cvInitFont( &font, CV_FONT_HERSHEY_SIMPLEX | CV_FONT_ITALIC,  
        hScale, vScale, 0, lineWidth );  
  cvPutText( img, "Hello World!", cvPoint( 200, 400 ), &font,  
        cvScalar( 255, 255, 0 ) );  
  cvShowImage( "My Window", img );  
  cvWaitKey();  
  return 0;  
 }  

Before we can compile it, first we need to link the opencv libraries with our own project. This can be done by right clicking your project in visual studio and clicking properties.
Go to linker->input and add to additional dependencies:

opencv_core242d.lib
opencv_imgproc242d.lib
opencv_highgui242d.lib
opencv_ml242d.lib
opencv_video242d.lib
opencv_features2d242d.lib
opencv_calib3d242d.lib
opencv_objdetect242d.lib
opencv_contrib242d.lib
opencv_legacy242d.lib
opencv_flann242d.lib

You will need to do this for every project you make (I’m not sure how to make this work for all projects, but if you find out leave a comment)


9. Run your progam


You should get this:

I hope this helped you even if you didn’t have the exact specs as me.

If this isn’t working for you, leave a comment below and I’ll try to get back to you as soon as possible.

An introduction

Categories Uncategorized
Hello and welcome to the beginning of my blog! To start off, I am a Grade 12 high school student who has been coding since I was 12. I had a lucky opportunity when I was young to take a programming class which has since then sparked an interest in the world of programming. I think schools need to start offering computer programs at younger grades since students never even learn to code until its offered as a course in Grade 10.

Anyways, in the past 5 years I’ve have been able to experience many different aspects of the programming world learning many different languages and touching many fields of computer science. I first started in C then moved to C++ (pretty much the same thing) and then Java (still pretty much the same). I have made a flash game called NeuropolX (probably wont find it on google, maybe on Newgrounds or Kongregate) using Actionscript 3. I’ve also made an iOS app called Athlete’s Arena (being processed in the app store) using Objective-C. I also do a lot of competitive computing and participate in various contest. I know a variety of different algorithms from dynamic programming to Djikastra (i think that’s how you spell it) and have implemented them countless times.

I love learning new and interesting things so I will try to share them with you on this blog and do some tutorials on different algorithms. I hope you’ll learn something from my blog! I’ll try to update my blog as often as possible.

Thanks for reading!