Creating a Ribbon Add-in for Office Word in NetOffice Visual Studio Express 2008 without VSTO

learnings of a young programmer


The OpenCV library is an open source library which means it is free to use but it also means that the documentation is not the greatest. Trying to install OpenCV and getting a program to run took me 3 hours going through various tutorials and guides. The legitimate OpenCV guide to installing did not work for me as well as the other guides. I combined a couple of methods together to get it finally working after hours of frustration.
Anyways that was my spiel on computer vision. I have Microsoft Visual Studio 2008 Express installed on my computer on a Windows Vista (x86 machine). These are the steps I used to get OpenCV working on my computer:
1. Download the OpenCV Project
Download the file at: http://sourceforge.net/projects/opencvlibrary/files/opencv-win/2.4.2/OpenCV-2.4.2.exe/download and run the .exe. The application should have extracted a bunch of files into a folder called opencv.
2. Download CMake
Now download CMake which will be used to “build” the project: http://www.cmake.org/files/v2.8/cmake-2.8.9-win32-x86.exe.
3. Run the CMake GUI program.
Where is the source code: <your OpenCV folder>
Where to build: <your OpenCV folder/build>
4. Build the binaries for your OpenCV library
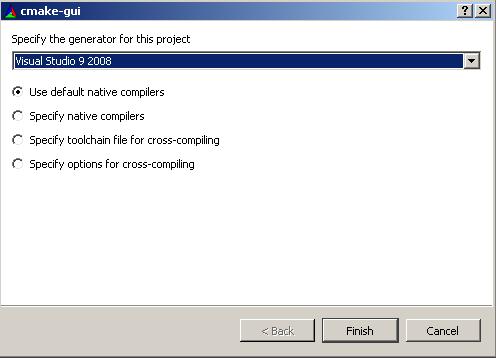
Click configure and select Visual Studio 9 2008.

Click Finish and it will output some information on your compiler.
5. Keep clicking generate until you get no more red text.
6. Configure in Visual Studio 2008 Express
Once you’re done that, open up Visual Studio 2008 Express. Tools -> options
In your “include files” add the following directories:
<your opencv folder>buildinclude
<your opencv folder>buildincludeopencv
In your “library files” add the following directories:
<your opencv folder>buildx86vc9lib
7. Configure .dlls to be used in system
Computer-> right click (properties) -> Advanced system settings
In user variables, go to path and click edit.
Add this line exactly as it is to the variable value. Key word: add. If you delete everything in there, you’re going to have a bad time.
;<your OpenCV folder>buildx86vc9bin>;<your openCV folderbuildcommontbbia32vc9
8. Create Hello World in OpenCV
Create a new Visual Studio 2008 Express projects. File-> New -> Project.
An empty win32 console project will be fine.
Create a new .cpp file and copy this hello world code into it:
 #include <cv.h>
 #include <highgui.h>
 int main ( int argc, char **argv )
 {
  cvNamedWindow( "My Window", 1 );
  IplImage *img = cvCreateImage( cvSize( 640, 480 ), IPL_DEPTH_8U, 1 );
  CvFont font;
  double hScale = 1.0;
  double vScale = 1.0;
  int lineWidth = 1;
  cvInitFont( &font, CV_FONT_HERSHEY_SIMPLEX | CV_FONT_ITALIC,
        hScale, vScale, 0, lineWidth );
  cvPutText( img, "Hello World!", cvPoint( 200, 400 ), &font,
        cvScalar( 255, 255, 0 ) );
  cvShowImage( "My Window", img );
  cvWaitKey();
  return 0;
 }
Before we can compile it, first we need to link the opencv libraries with our own project. This can be done by right clicking your project in visual studio and clicking properties.
Go to linker->input and add to additional dependencies:
opencv_core242d.lib
opencv_imgproc242d.lib
opencv_highgui242d.lib
opencv_ml242d.lib
opencv_video242d.lib
opencv_features2d242d.lib
opencv_calib3d242d.lib
opencv_objdetect242d.lib
opencv_contrib242d.lib
opencv_legacy242d.lib
opencv_flann242d.lib
You will need to do this for every project you make (I’m not sure how to make this work for all projects, but if you find out leave a comment)
9. Run your progam
You should get this:
I hope this helped you even if you didn’t have the exact specs as me.
If this isn’t working for you, leave a comment below and I’ll try to get back to you as soon as possible.