Tutorial: Getting Started with Machine Learning with the SciPy stack

Categories Machine Learning, Uncategorized
There are many machine learning libraries out there, but I heard that SciPy was good so I decided to try it out. We will be doing a simple walkthrough a k means clustering example:

Full Source Here


Sample Data Here

SciPy Stack

The contents of the SciPy stack are:

Python: Powerful scripting language
Numpy: Python package for numerical computing
SciPy: Python package for scientific computing
Matplotlib: Python package for plotting
iPython: Interactive python shell
Pandas: Python package for data analysis
SymPy: Python package for computer algebra systems
Nose: Python package for unit tests

Installation

I will go through my Mac installation but if you are using another OS, you can find the installation instructions for SciPy on: http://www.scipy.org/install.html.

You should have Python 2.7.

Mac Installation

I am using a Mac on OS X 10.8.5 and used MacPorts to setup the SciPy stack on my machine.

Install macports if you haven’t already: http://www.macports.org/

Otherwise open Terminal and run: ‘sudo macports selfupdate’

Next in your Terminal run: ‘sudo port install py27-numpy py27-scipy py27-matplotlib py27-ipython +notebook py27-pandas py27-sympy py27-nose’

Run the following in terminal to select package versions.

sudo port select –set python python27
sudo port select –set ipython ipython27

Hello World

IPython allows you to create interactive python notebooks in your browser. We will get started by creating a simple hello world notebook.
Create a new directory where you want your notebooks to be placed in.
In your directory, run in terminal:
ipython notebook

This should open your browser to the IPython notebook web interface. If it does not open, point your browser to http://localhost:8888.

 Click New -> Notebooks -> Python 2


This should open a new tab with a newly create notebook.

Click Untitled at the top, rename the notebook to Hello World and press OK.

In the first line, change the line format from Code to Markdown and type in:

# Hello World Code

And click run (the black triangle that looks like a play button)

On the next line, in code, type:

print ‘Hello World’

and press run.

K Means Clustering Seed Example

Suppose we are doing a study on a wheat farm to determine how much of each kind of wheat is in the field. We collect a random sample of seeds from the field and measure different attributes such as area, perimeter, length, width, etc. Using this attributes we can use k-means clustering to classify seeds into different types and determine the percentage of each type.

Sample data can be found here: http://archive.ics.uci.edu/ml/datasets/seeds

The sample data contains data that comes from real measurements. The attributes are:

1. area A, 
2. perimeter P, 
3. compactness C = 4*pi*A/P^2, 
4. length of kernel, 
5. width of kernel, 
6. asymmetry coefficient 
7. length of kernel groove. 

Example: 15.26, 14.84, 0.871, 5.763, 3.312, 2.221, 5.22, 1

Download the file into the same folder as your notebook.

Code

Create a new notebook and name it whatever you want. We can put all the code into one cell.

First, we need to parse the data so that we can run k-means on it. We open the file using a csv reader and convert each cell to a float. We will skip rows that contain missing data.

Sample row:

['15.26', '14.84', '0.871', '5.763', '3.312', '2.221', '5.22', '1']
# Read data
for row in bank_csv:
    missing = False
    float_arr = []
    for cell in row:
        if not cell:
            missing = True
            break
        else:
            # Convert each cell to float
            float_arr.append(float(cell))
    # Take row if row is not missing data
    if not missing:
        data.append(float_arr)
data = np.array(data)

Next, we normalize the features for the k means algorithm. Since Scipy implements the k means clustering algorithm for us, all the hard work is done.

# Normalize vectors
whitened = vq.whiten(data)

# Perform k means on all features to classify into 3 groups
centroids, _ = vq.kmeans(whitened, 3)

We then classify each data point by distance to centroid:

# Classify data by distance to centroids
cls, _ = vq.vq(whitened, centroids)

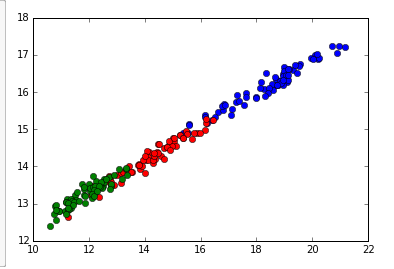
Finally, we can graph the classifications of the data points by the first two features. There are seven features total, but it would be hard to visualize. You can graph by other features for similar visualizations.

# Plot first two features (area vs perimter in this case)
plt.plot(data[cls==0,0], data[cls==0,6],'ob',
        data[cls==1,0], data[cls==1,6],'or',
        data[cls==2,0], data[cls==2,6],'og')
plt.show()

Note: to show the plot inline in the cell, we put ‘%matplotlib inline’ at the beginning of the cell.

Sample Data Here

Tutorial: Setting up and Installing the MEAN stack

Categories Uncategorized

Tutorial: Setting up the MEAN stack

The MEAN stack: (MongoDB, ExpressJS, AngularJS and Node.JS) are a group of powerful technologies that allow you to write a completely functional website from back-end to front-end using only Javascript. Using only Javascript allows developers to only in one language instead of managing several different languages (such as PHP or Ruby) from front and back end. Javascript does have its own pitfalls, but it is still a powerful language is utilized correctly.
MongoDB: Open source NoSQL database
ExpressJS: Web application framework for node (serves front end)
NodeJS: Fast efficient nonblocking backend 
AngularJS: Front end for enhancing web apps

Project available on GitHub: https://github.com/ayoungprogrammer/meanTemplate

Install Eclipse IDE

For web development, I find Eclipse is very useful as it comes with a visual of the file system and can compile from the IDE. 

Install Node.JS

Download nodejs at:

Install ExpressJS

In console type:
npm install express -g
This will install express globally on your machine.
You may need to use 
sudo npm install express -g

Install Nodeclipse for using Node.js in Eclipse

Follow instructions at:

Install MongoDB

Follow download instructions at:
For MacOSX you can use homebrew to install mongoDB quickly:
brew install mongodb
Create your first Express project
In Eclipse -> File -> New -> Express Project
Type in your new project name and click finish when done.
You should have a project that looks like this:
public
     |——-   stylesheets
                        |————-styles.css
routes
      |—————index.js
      |—————user.js
view
      |—————layout.jade
      |—————index.jade
app.js
package.json
README.md
Here is an explanation of what each thing does:
public: Everything in the public folder is served to the client by expressJS
stylesheets: Commonly, this folder will contain all the .css files for a website
styles.css: This is the current CSS file for the default webpage
routes: This folder contains the routes files for which requests are directed
index.js: This file contains the routes for index
user.js: This file contains the routes for users [this can be deleted]
view: This folder contains the views of the application
layout.jade: This file is the default template of a webpage
index.jade: This file is the index webpage
app.js This is the main file that node.js runs
package.json: This file tells node the project dependencies to install
README.md: This file tells another developer what the project is
      
The project currently uses the Jade templating engine to render pages. A template engine compiles source files into html files. 

Run the app

In console type:
node app.js
In your browser, type in the url: http://localhost:3000
If you have done everything correctly, then you should see this:

Express

Welcome to Express

Install Bower

Bower is a tool for installing other libraries similar to npm.
To install, type the following into a console:
npm install bower -g 
If you have errors, you may need to use 
sudo npm install bower -g 
Create a folder called public/js
This folder is where all the javascript files will be placed for the front end
Create another folder called public/js/vendor
This folder is where all the vendor Javascript libraries will be placed. Vendor means external 3rd party libraries such as AngularJS which we will be installing.
Create a file called .bowerrc in your project directory with the following:
{ “directory” : “public/js/vendor” }
Everything that bower installs will be put into /public/js/vendor.

Install AngularJS

We use bower to install AngularJS by typing in console:
bower install angular
This should install angularjs into public/js/vendor. At the time of writing this tutorial, the version is 1.2.3.
Install Mongoose
Mongoose is the api to connect to MongoDB.
We can install it by adding a dependency in package.json:
 “dependencies”: {
    “express”: “3.4.0”,
    “jade”: “*”,
    “mongoose”: “*”
  }
and putting into console from the project directory:
npm install 
NPM will automatically look at package.json and look for dependencies to install. 

Your tools are ready!

The MEAN stack tools are all ready and installed but the project does not do anything right now.
We will build a MEAN app in the next part of the tutorial.